Are you a visual learner? Check out these guides made by our community!
What is Exascale Armor?
The Exascale Armor set is one of Elsword’s numerous different progress armors released with the launch of the Serpentium region. The armor has multiple forms of customization with its unique Circuit Amplification and Chip Tuning systems allowing players to build the set that helps them the most.
Obtaining the Exascale Armor Set
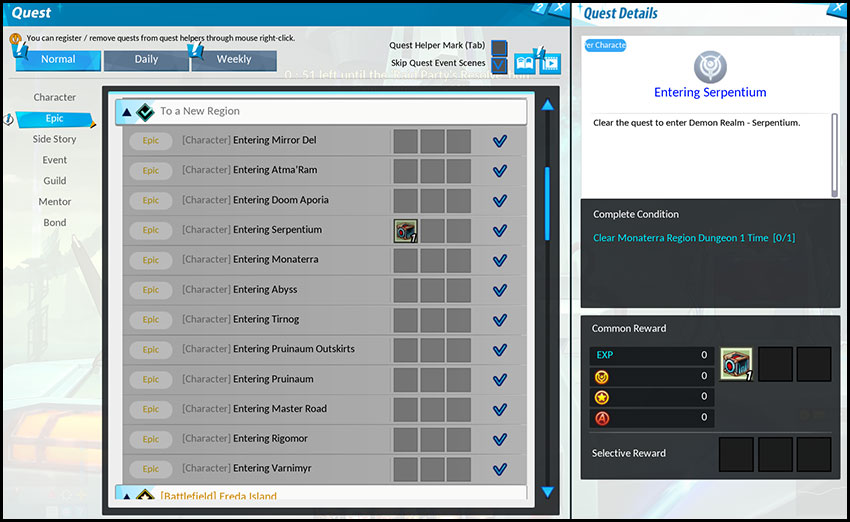
Those looking to obtain the armor only need to complete one simple quest to obtain the full armor set for their character. After unlocking the Monaterra Region, the quest “Entering Serpentium” will become available in your Epic Quest list under “A New Region”. By clearing 1 dungeon in the Monaterra Region, you will unlock access to Serpentium’s dungeons, the Camp: Steel Wall rest area, and an Exascale Armor Cube.
Reforge
- Similar to the Amethystine Prophecy and Tenebrous Armor sets, the Reforge system makes its return to power up the Exascale Armor’s base stats and add some bonus effects.
- The Equipment Refiner in Elrianode and Weapon Shop Betty in Magmelia will allow you to reforge your Exascale Armor.
- Materials for reforging the Exascale Armor include the following:
| Material Name | Icon | How to Acquire |
| Refined Exikel | Acquired from Serpentium Dungeons or by completing Serpentium Daily Quests |
|
| Zetrium Steel | Acquired from Serpentium Dungeons | |
| Magical Crystal | Acquired from Dungeon Gameplay or by dismantling equipment |
- Starting to reforge your Exascale Armor set can begin in one of two ways based on your preference:
|
Reforge Method
|
Description |
|
No Reforge Transfer
|
The Exascale starts at Reforge Level 0. If you wish to save on materials, you can reforge from here to your desired level |
|
Normal Reforge Transfer
|
Transfer your Tenebrous Armor’s Reforge Level to your Exascale. This will consume Refined Exikel, Zetrium Steel, Magical Crystals, and ED to perform. Cost of materials and ED will depend on the Reforge Level of your Tenebrous Armor |
|
Special Reforge Transfer
|
Transfer your Tenebrous Armor’s Reforge Level to your Exascale armor using Reforge Stage Transfer Tickets, Magical Crystals, and ED.
Cost of materials and ED will depend on the Reforge Level of your Tenebrous Armor. Reforge Stage Transfer Tickets can be purchased in the Item Mall |
- When transferring your Reforge Level from Tenebrous to Exascale, your Tenebrous Armor must be Reforge Level 18 or higher.
- Upon transfer, the Reforge Level for Exascale Armor will be reduced by 6 stages.
- E.g, if you Reforge Transfer your Tenebrous Armor at Reforge Level 18, your Exascale Armor will be at Reforge Stage 12.
- Your Reforge Level and Guaranteed Reforge Gauge for your Tenebrous Armor used will reset to 0.
- The Armor piece will not be deleted and will retain its Enhancement level.
- The Exascale Armor receiving the transfer will have its Guaranteed Reforge Gauge reset and will be put in Sealing Impossible state.
- The Enhancement and Socket Systems work the same as prior equipment sets.
Example of the Reforge Transfer Page for Normal Reforge Transfer:
Explaining Circuit Amplification
- Circuit Amplification is the main function of the Exascale Armor when customizing the set to your liking.
- Those familiar with Elrianode Armor’s El Tear System prior to the quality of life changes will find the Circuit Amplification system to be similar in functionality.
- You will need to earn Amplified Circuits of various shapes, colors, and effects to add to your armor’s Circuit Assembly and improve the armor set.
For shapes, you can find them in types I, L, and T. These can be any color (Red, Blue, or Green), and for either Top Piece, Bottom Piece, Gloves, or Shoes.
| Shape | Example 1 | Example 2 |
| I-Type | ||
| L-Type | ||
| T-Type |
| Color | Circuit |
| Red | |
| Blue | |
| Green |
For Stats, each piece of equipment can have access to specific stats, while some stats are shared between all pieces. Which stat and its value provided is revealed upon identifying the circuits. All stats and values listed below can be found on any shape and color.
| Armor Part | Stat | Minimum Value | Maximum Value |
| Top Piece | All Skill Damage | 0.7% | 1% |
| Deal n% of Damage as Continuous Damage for 3 sec. | 0.7% | 1% | |
| Critical Damage | 0.7% | 1% | |
| Used Skill Cooldown Reset | 0.7% | 1% | |
| Critical | 0.7% | 1% | |
| Maximize | 0.7% | 1% | |
| Damage to Boss | 0.7% | 1% | |
| Awakening Duration | 0.7% | 1% | |
| All Elemental Resistance | 3 | 6 | |
| Movement Speed | 0.7% | 1% | |
| Jump Speed | 0.7% | 1% | |
| Physical Defense | 0.7% | 1% | |
| Magical Defense | 0.7% | 1% | |
| Boss Damage Reduction | 0.7% | 1% | |
| Bottom Piece | Damage Reduction | 0.7% | 1% |
| HP | 0.7% | 1% | |
| Recovery Item Effect | 0.7% | 1% | |
| Polarize | 0.7% | 1% | |
| Damage to Enemies with Less than 50% HP | 0.7% | 1% | |
| Damage to Enemies with More than 50% HP | 0.7% | 1% | |
| Critical | 0.7% | 1% | |
| Maximize | 0.7% | 1% | |
| Damage to Boss | 0.7% | 1% | |
| Awakening Duration | 0.7% | 1% | |
| All Elemental Resistance | 3 | 6 | |
| Movement Speed | 0.7% | 1% | |
| Jump Speed | 0.7% | 1% | |
| Physical Defense | 0.7% | 1% | |
| Magical Defense | 0.7% | 1% | |
| Boss Damage Reduction | 0.7% | 1% | |
| Gloves | Command Attack Damage | 0.7% | 1% |
| Active, Tenacity, Strength, Bravery Skill Damage | 0.7% | 1% | |
| Hyperactive Skill Damage | 0.7% | 1% | |
| All Master Skill Damage | 0.7% | 1% | |
| Critical | 0.7% | 1% | |
| Maximize | 0.7% | 1% | |
| Damage to Boss | 0.7% | 1% | |
| Awakening Duration | 0.7% | 1% | |
| All Elemental Resistance | 3 | 6 | |
| Movement Speed | 0.7% | 1% | |
| Jump Speed | 0.7% | 1% | |
| Physical Defense | 0.7% | 1% | |
| Magical Defense | 0.7% | 1% | |
| Boss Damage Reduction | 0.7% | 1% | |
| Shoes | Consumable Cooldown Reduction | 0.7% | 1% |
| All Master Skill Cooldown Reduction | 0.7% | 1% | |
| MP Cost Reduction | 0.7% | 1% | |
| Action Speed | 0.7% | 1% | |
| Buff — Nearby Allies’ Movement Speed | 0.5% | 0.8% | |
| Buff — Nearby Allies’ Action Speed | 0.5% | 0.8% | |
| Critical | 0.7% | 1% | |
| Maximize | 0.7% | 1% | |
| Damage to Boss | 0.7% | 1% | |
| Awakening Duration | 0.7% | 1% | |
| All Elemental Resistance | 3 | 6 | |
| Movement Speed | 0.7% | 1% | |
| Jump Speed | 0.7% | 1% | |
| Physical Defense | 0.7% | 1% | |
| Magical Defense | 0.7% | 1% | |
| Boss Damage Reduction | 0.7% | 1% |
- In addition, a special Replicator Circuit can be obtained.
- This Circuit is a T-Type exclusive circuit that has no dedicated stat or value tied to it.
- Instead, the circuit replicates half of the value of connected circuits.
- Due to its half value application, you will want to connect it to high valued circuits to maximize its potential.
- However, a Replicator Circuit cannot replicate other Replicator Circuits if connected.
Equipping Circuits to your Exascale Armor
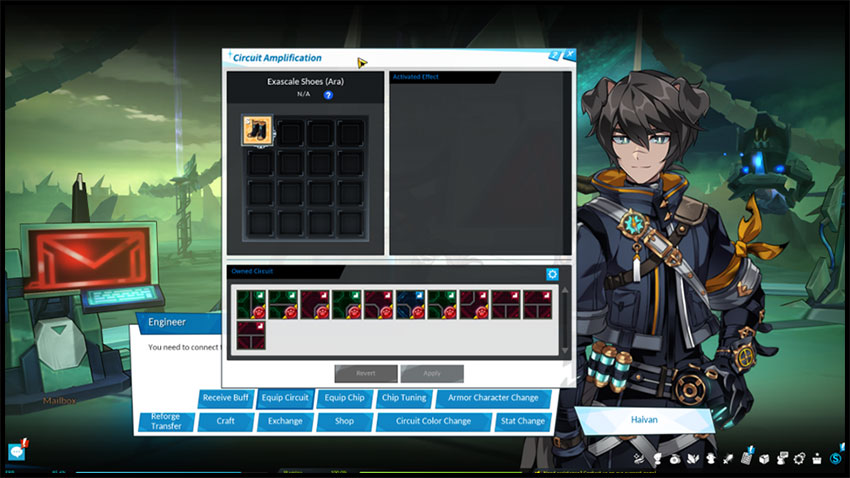
In the rest area, Camp: Steel Wall, you’ll be able to interact with the NPC Haivan who will be your go-to for improving your Exascale Armor, including equipping Amplified Circuits to your armor.
- To earn Amplified Circuits, you can complete Fabricated City and Madam Corae’s Garden in the Serpentium Region, dropping all 3 Shapes and Types.
- Both Serpentium and Doom Aporia Raids can drop T-Type Circuits exclusively.
- You can also purchase Standard Circuit Cube for I and L-Type Circuits from Haivan.
- The in-game Market Board may also have listings for various circuit types and stats from players selling ones they don’t need.
- All Colors and effects are possible from all available locations.
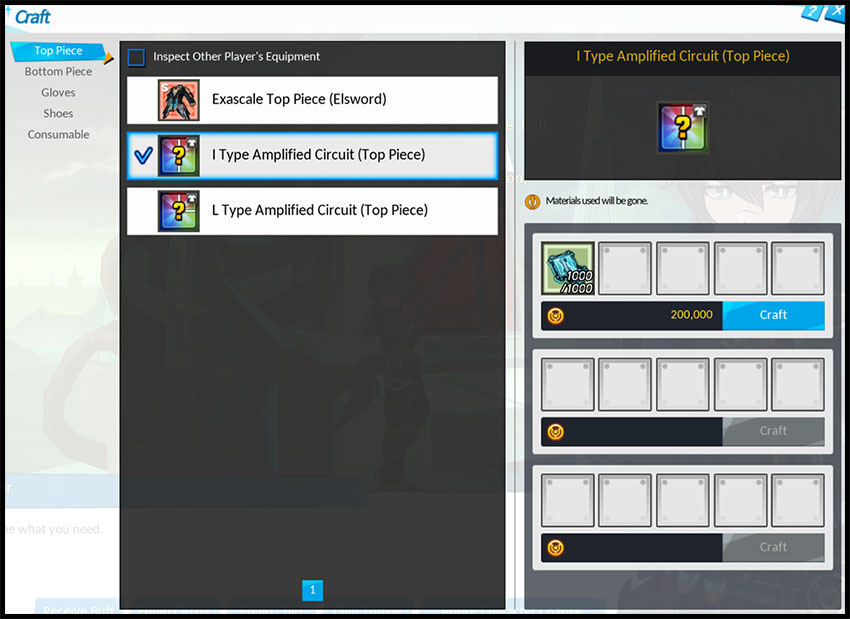
- For any Amplified Circuits you obtain but have no need for, you can dismantle them to obtain Circuit Fragments, and use the fragments to craft a new I Type or L Type Amplified Circuit for the armor piece you need.
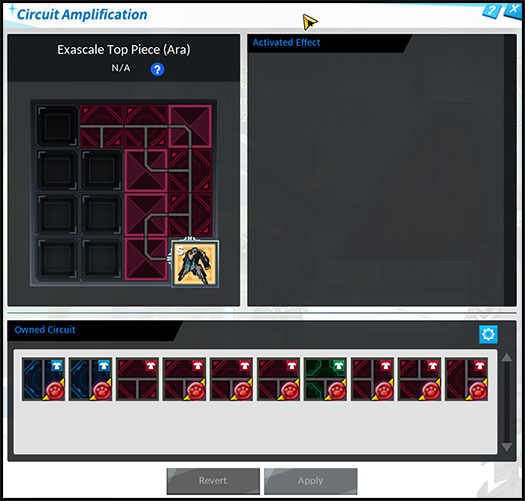
Once you have the circuits you want, you can talk to Haivan, choose the Equip Circuit option, and select the Armor piece you want to add your circuits to.
- Each armor piece will have a total of 15 Circuit slots to fill up.
- The objective is to connect both open sides of your equipment piece together using the Amplified Circuit.
- This will then create a current providing you the benefits and setting up your armor as needed.
- However, when connecting your circuits, you should make sure you don’t leave any unconnected openings or mix different colored circuits.
- Doing so will cause the Exascale Armor piece to not properly activate the circuit benefits.
- While you don’t need to equip circuits into all slots to activate the Circuit or Set Effects, it is highly recommended to do so to increase your overall benefits.
- If you apply a circuit to a piece of equipment, and get a better circuit to replace it with, you can replace the circuit slot with the newly acquired circuit.
- Note that doing so will cause the old circuit to be deleted as a result.
Examples of what not to do
1: Same color but contains an unconnected line in the circuit.
- Despite having a loop between both openings, the two circuits at the very top lead to an open and empty slot.
- This means all possible stat increases from the circuits will not be obtained and the Set Effect will not apply.
- Using various combinations of L and I Shaped Circuits to close the loop using the available empty slots would fix the issue.
2: Closed loop but different colors.
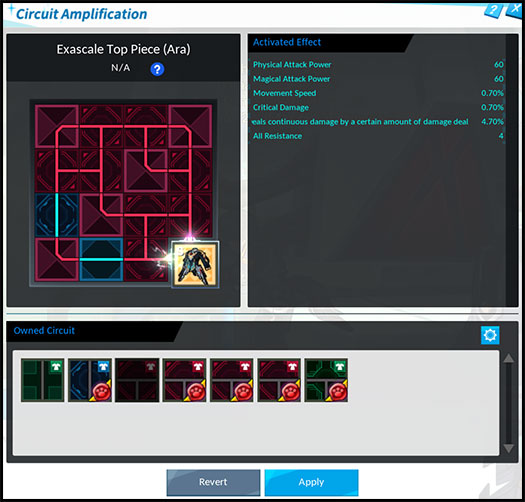
- The circuits connect properly providing you with the stats from each of the various circuits.
- However, we are not using all Red Circuits, meaning we lose out on the Compute Set Effect we would obtain normally.
Example of a correct setup
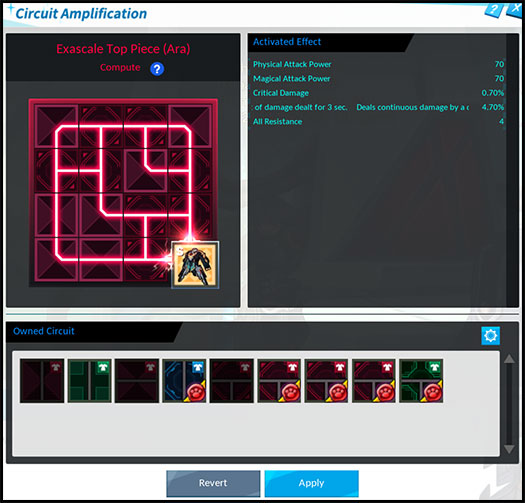
- The circuits are properly looped and all match the same color, allowing us to obtain the Compute set effect and activated stats.
- The Activated Effects will show you the total benefits of all equipped circuits based on what stat and value they provide.
For Replicator Circuits
- As mentioned, Replicator Circuits provide half the value of stats the circuit is connected to.
- To maximize your potential stat growth from the Circuit, you would want to place the Replicator Circuit in specific spots to connect with 3 Circuits.
- The marked locations for example are the best spots for the Replicator Circuit for the Top Armor Piece.
- If you were to, for example, focus on Continuous Damage with the values
- 0.8%
- 0.7%
- 1.0%
- this would provide halved values
- 0.4%
- 0.35%
- 0.5%
- Totalling to 1.25%, which is the value towards the Continuous Damage stat you will receive from the Replicator Circuit.

Exascale Set Effects
The Exascale Armor will provide a set effect if all 4 pieces have the same colored circuits connected appropriately like in the screenshot below.
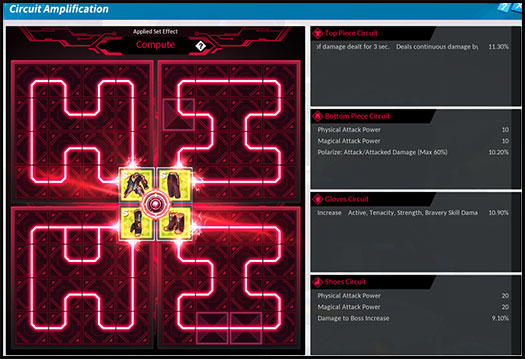
These set effects vary between all 3 sets, providing the following.
|
Set Name
|
Set Effect
|
|
Compute (Red)
|
Adaptation +2% (Max 60%) Buff – Nearby Allies’ Critical Damage +10% (Does not stack) Obtain ‘Logic’ Effect for 30 sec. every time Active and Special Active Skill is used. (Max 20 stacks) When ‘Logic’ reaches 20 stacks, obtain ‘Generate’ effect. Logic: Physical/Magical Attack +1% per stack Generate: Pressing the [Item Special Function] key removes all stacks of ‘Logic’ and replaces them with ‘Reset’ effect that lasts for 5 sec. Reset: Master Skill/Hyperactive Skill Damage +500% and Received Potion Recover Effect -50%. Logic Effect cannot be obtained. |
|
Cycle (Blue)
|
Adaptation +2% (Max 60%) Buff – Nearby Allies’ Critical Damage +10% (Does not stack) Obtain ‘Flow’ Effect after starting dungeon. Change to ‘Resist’ effect if the Armor’s Skill Cooldown Reset Effect activates while holding the ‘Flow’ Effect. Change to ‘Flow’ effect if the Armor’s Skill Cooldown Reset Effect activates while holding the ‘Resist’ Effect. Flow: Skill Cooldown Reset Chance +8%, Special Active Skill Cooldown Acceleration by 1.2 times Resist: Skill Cooldown Reset Chance +8%, All Skill Damage +16% |
|
Restore (Green)
|
Adaptation +2% (Max 60%) Buff – Nearby Allies’ Physical Attack +10% Buff – Nearby Allies’ Magical Attack +10% Buff – Nearby Allies’ All Skill Damage by the [Sum of Active, Tenacity, Strength, Bravery Skill Damage Increase on Gloves Circuit x 0.8] (Does not stack) Obtain ‘Repair’ Effect for 60 sec. after starting dungeon Change to ‘Bridge’ Effect once ‘Repair’ Effect ends Change to ‘Complete’ Effect for 10 sec. if [Item Special Function] is pressed while holding the ‘Bridge’ Effect Change to ‘Repair’ Effect for 60 sec. once ‘Complete’ Effect ends Repair: Damage Reduction +12% Bridge: Upon obtaining the effect, generates a 1 time shield equal to 30% of Max HP to nearby allies. (Shield Duration 10 sec.) Complete: For 10 sec., Action Speed +15%. Cooldown for the skill registered in Transcendence Skill Slot will become 0.5 sec. for all nearby allies. Using the skill 5 times will end the effect. (Complete buff will not be reapplied for 60 sec.) |
Which set effect should I aim for?
- A common question to ask is which set effect to go for their character or class.
- As Compute (Red) and Cycle (Blue) provide similar base effects but different unique effects, these are good for characters and classes who want to focus and improve their damage
- Compute provides Attack% increase based on Logic stacks. Characters who can build stacks quickly can benefit from this one, but is a great set all around.
- Cycle focuses around Skill Cooldown Resets, good for those who benefit from casting 1 skill multiple times and want their skills available sooner.
- Restore (Green) set effects mainly provide buffs to nearby allies over improving your own personal damage.
- This makes the set great for support-type classes like Bluhen, Radiant Soul, Nyx Pieta, etc. who like to apply buffs to their party.
- The set also provides the Complete effect when using its special function, a 10 second buff that allows players to use their Transcendence Skills up to 5 times repeatedly.
- This effect is very useful for burst damage opportunities in all dungeon types.
- As Compute (Red) and Cycle (Blue) provide similar base effects but different unique effects, these are good for characters and classes who want to focus and improve their damage
T.E.S System Chips
- In addition to Amplified Circuits, you can also equip each piece of Exascale Armor with a T.E.S System Chip.
- T.E.S System Chips can be obtained from clearing Serpentium or Doom Aporia Raids.
- Outside of Events and purchasing from other players on the Market Board, these are the only way to currently obtain them.
- Similar to equipping Circuits, you can equip a Chip to your Exascale Armor by talking to Haivan and selecting the “Equip Chip” option.
- Before you can start equipping them however, you must Tune your T.E.S. System Chips by talking to Haivan and choose Chip Tuning.
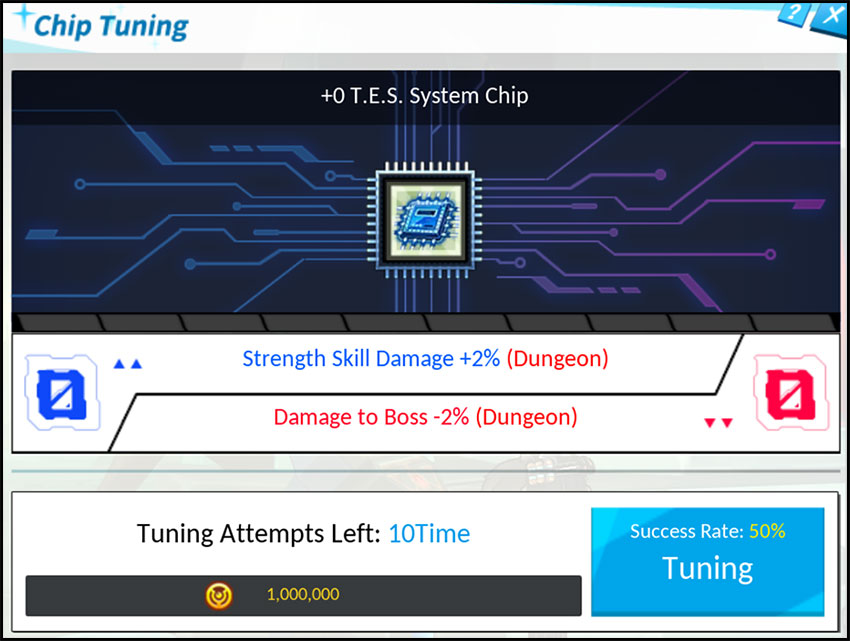
- T.E.S System Chips are similar to Harconium Equipment for the Tenebrous Armor in that they provide both a Positive Stat (Blue) and Negative Stat (Red) effect.
- Through the Chip Tuning System, you will improve either the Positive or Negative effect provided each attempt.
- With a Tuning Success, the Positive stat value will increase, giving you an overall increase benefit, and will reduce the next Tuning Success Rate by 10%.
- The next tuning success rate will be reduced by 10%
- With a Tuning Fail, the Negative stat value will increase, reducing the listed stat further, and increase the next Tuning Success Rate by 10%.
- With a Tuning Success, the Positive stat value will increase, giving you an overall increase benefit, and will reduce the next Tuning Success Rate by 10%.
- Each attempt will require ED, with the value increasing by 1,000,000 for each success count.
- Success rate will never go above 70%, or below 30%.
- Once you complete all attempts, you will be able to equip the T.E.S System Chip to your Exascale Armor of choice.
- Similar to Circuits, if you get a better T.E.S System Chip and wish to replace it, you can.
Positive/Negative Stat Effects
| Positive Stat | Starting Value | Max Value (+10) |
| Critical Damage | 1% | 10% |
| Polarize | 1% | 10% |
| All Skill Damage Increase | 1% | 10% |
| Deal n% of Damage as Continuous Damage for 3 sec. | 1% | 10% |
| Physical Attack Increase | 1% | 10% |
| Magical Attack Increase | 1% | 10% |
| Damage to Boss Increase | 2% | 14% |
| Boss Damage Reduction | 2% | 14% |
| Action Speed | 2% | 14% |
| Item Recovery Effect | 2% | 14% |
| HP Increase | 2% | 14% |
| Tenacity Skill Damage Increase | 2% | 14% |
| Strength Skill Damage Increase | 2% | 14% |
| Bravery Skill Damage Increase | 2% | 14% |
| Hyperactive Skill Damage Increase | 2% | 14% |
| Damage Reduction | 2% | 14% |
| Damage to Enemies at More Than 50% HP | 1% | 10% |
| Damage to Enemies at Less Than 50% HP | 1% | 10% |
| Critical | 3% | 16% |
| Maximize | 3% | 16% |
| Negative Stat | Starting Value | Max Value (+10) |
| Critical Damage | -2% | -12% |
| Polarize | -2% | -12% |
| All Skill Damage Increase | -2% | -12% |
| Damage to Boss Increase | -2% | -12% |
| Boss Damage Reduction | -2% | -12% |
| Action Speed | -2% | -12% |
| HP Increase | -2% | -12% |
| Skill Cooldown Increase | 2% | 12% |
| MP Cost | 2% | 12% |
| Damage Reduction | -2% | -12% |
| Max MP Increase | -10 | -110 |
| All Resistance Reduction | -50 | -150 |
| Critical | -5% | -15% |
| Maximize | -5% | -15% |